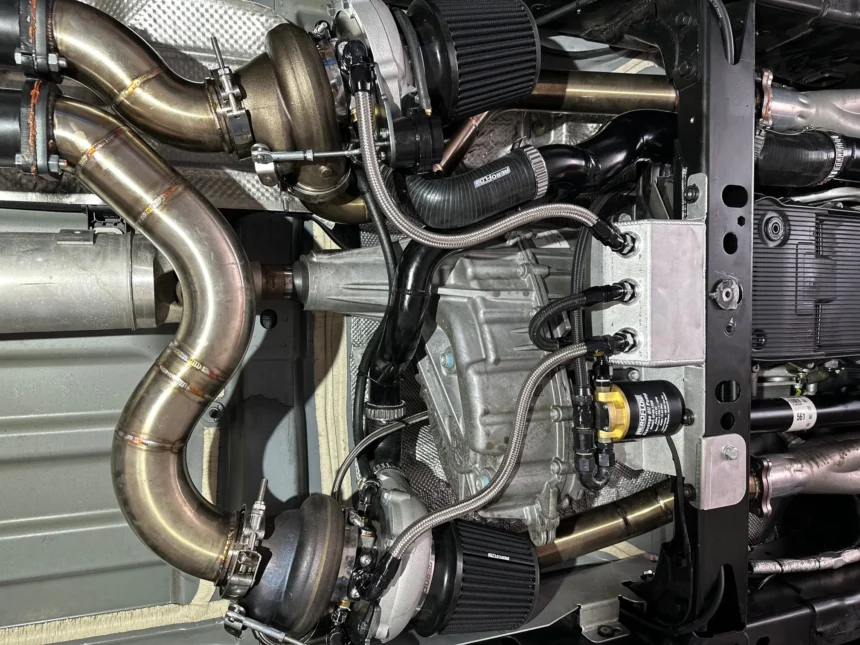
The 5.7 Hemi engine has earned its reputation as a powerhouse, but adding a turbo for 5.7 Hemi can transform your ride into something truly extraordinary. Whether you’re looking to boost horsepower for track days or simply want more passing power on the highway, an Aeatos turbo for 5.7 hemi system delivers impressive results when installed correctly.
Installing a turbo for 5.7 hemi system might seem daunting, but with the right tools, patience, and attention to detail, you can tackle this project in your garage. This comprehensive guide walks you through every step of the Aeatos turbo installation process, from preparation to final testing.
Before diving in, understand that this modification requires mechanical experience and specialized tools. If you’re not comfortable working with exhaust systems, engine components, and complex installations, consider having a professional handle the job. Safety should always be your top priority.
Tools and Materials You’ll Need
Getting organized before you start saves time and prevents frustration. Here’s what you’ll need for your Aeatos turbo installation:
Essential Tools:
- Socket wrench set (metric and standard)
- Torque wrench
- Jack and jack stands
- Engine hoist or support
- Cutting tools for exhaust modifications
- Welding equipment (if required)
- Thread sealant and gasket maker
- Safety glasses and gloves
Aeatos Turbo Kit Components:
- Turbocharger unit
- Exhaust manifold or headers
- Intercooler and piping
- Oil feed and return lines
- Wastegate and blow-off valve
- All necessary brackets and hardware
- Installation manual and gaskets
Double-check that your Aeatos kit is specifically designed for the 5.7 Hemi. Generic turbo kits rarely fit properly and can cause serious engine damage.
Pre-Installation Preparation
Start by disconnecting the battery and allowing the engine to cool completely. Hot engine components can cause severe burns, so patience here prevents injury.
Remove the engine cover and air intake system to access the exhaust manifolds. You’ll also need to drain the engine oil and remove the oil filter, as you’ll be installing new oil lines for turbo lubrication.
Take photos of the engine bay before removing any components. These reference images prove invaluable when reassembling everything later.
Clean your workspace thoroughly. Dirt and debris can contaminate engine components or fall into open ports, causing expensive damage down the road.
Installing the Exhaust Manifold
The stock exhaust manifolds must be removed to make way for the turbo-specific manifold included in your Aeatos kit. This step requires patience, as exhaust bolts often seize due to heat cycling.
Apply penetrating oil to all exhaust manifold bolts and let it soak for at least 30 minutes before attempting removal. Work slowly to avoid breaking bolts in the cylinder head.
Once the old manifolds are removed, clean all gasket surfaces with a scraper and degreaser. Any residue left behind can cause exhaust leaks that reduce turbo efficiency and create safety hazards.
Install the new turbo manifold using the provided gaskets and hardware. Follow the torque specifications exactly—over-tightening can warp the manifold or crack the cylinder head.
Mounting the Turbocharger
Position the turbocharger on the new manifold and secure it with the provided hardware. The turbo should sit level and have adequate clearance from surrounding components.
Before fully tightening, verify that the compressor inlet and outlet align properly with your intercooler piping. Misalignment creates stress on connections and can cause failures later.
Check that the turbo’s oil drain port is positioned to gravity-feed back to the oil pan. Poor drainage can cause oil to back up in the turbo, leading to seal failure and oil consumption issues.
Oil System Modifications
Your turbo for 5.7 Hemi requires both pressurized oil feed and a gravity return line. The oil feed typically connects to an existing oil pressure port on the engine block, while the return line drains back to the oil pan.
Install the oil feed line first, using thread sealant on all fittings. Route the line away from hot exhaust components and secure it with the provided brackets to prevent vibration damage.
The oil return line requires more work, as you’ll likely need to drill and tap the oil pan or install a fitting in an existing port. Take extra care to keep metal shavings out of the oil pan during this process.
Test all oil connections for leaks before proceeding. Even small leaks can cause oil starvation and destroy the turbo bearings.
Intercooler and Piping Installation
Mount the intercooler in front of the radiator using the supplied brackets. Ensure adequate airflow and clearance from moving parts like the cooling fan.
Route the intercooler piping according to the kit instructions, avoiding sharp bends that restrict airflow. Use the provided silicone couplers and clamps at all connections.
Install the blow-off valve and wastegate according to the specifications. These components control boost pressure and protect your engine from over-pressurization.
Fuel System Considerations
Adding a turbo significantly increases your engine’s air intake, which means you’ll need more fuel to maintain proper air-fuel ratios. While not always included in turbo kits, you may need to upgrade fuel injectors or add a fuel system controller.
Consult with a tuning professional about fuel system requirements for your specific setup. Running lean with a turbo can cause catastrophic engine damage in seconds.
Final Assembly and Testing
Reinstall all removed components, including the air intake system and engine covers. Double-check that all connections are secure and properly torqued.
Add fresh engine oil and install a new oil filter. The turbo will consume some oil during break-in, so check levels frequently during the first few hundred miles.
Start the engine and let it idle while checking for leaks. Listen for unusual noises that might indicate installation problems.
Take your first test drive conservatively, keeping boost levels low until the turbo breaks in properly. Most manufacturers recommend at least 500 miles of gentle driving before unleashing full boost.
Professional Tuning Requirements
A turbo for 5.7 Hemi requires professional engine tuning to run safely and efficiently. The stock engine management system isn’t programmed for forced induction, so custom tuning is essential.
Find a tuner experienced with Hemi engines and turbo systems. Poor tuning can destroy your engine faster than any mechanical failure, so don’t cut corners here.
Expect to spend additional money on dyno tuning sessions to optimize performance and ensure reliability. This investment protects your engine and maximizes the benefits of your turbo upgrade.
Taking Your Build to the Next Level
Installing an Aeatos turbo transforms your 5.7 Hemi into a formidable powerplant, but proper installation and tuning are crucial for success. Take your time with each step, prioritize safety, and don’t hesitate to seek professional help when needed.
Remember that turbocharging puts additional stress on all engine components. Regular maintenance becomes even more critical, so stay on top of oil changes and monitor your engine closely for any signs of trouble.
With careful installation and proper tuning, your turbocharged 5.7 Hemi will deliver years of increased performance and driving enjoyment.


