Introduction
Are you tired of drinking tap water that tastes less than fresh? Or maybe you’re looking to save some cash while still enjoying clean, pure water at home? Installing a used RO (Reverse Osmosis) unit could be the perfect solution for you. This eco-friendly option not only helps reduce your environmental footprint but also offers incredible benefits for your health and wallet. Imagine having crisp, delicious water on demand without breaking the bank! If you’ve recently purchased a used RO system or are considering it, this step-by-step guide will walk you through everything you need to know about installation. Get ready to transform your hydration game!
What is a Reverse Osmosis (RO) Unit?
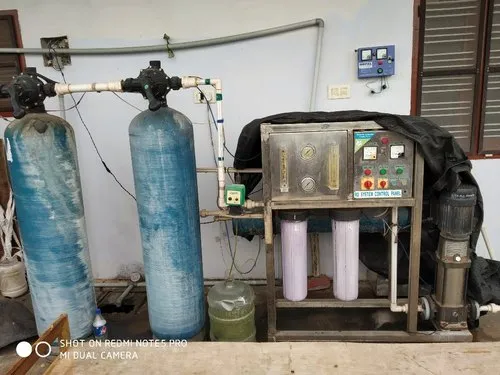
A Reverse Osmosis (RO) unit is a water purification system that uses advanced filtration technology. It effectively removes contaminants from water, making it cleaner and healthier for consumption.
The process involves pushing water through a semi-permeable membrane. This membrane allows only pure water molecules to pass while trapping impurities such as salts, chemicals, and microorganisms.
RO systems are commonly used in homes and industries alike. They provide an efficient way to ensure safe drinking water by targeting common pollutants like chlorine, lead, and nitrates.
Many people appreciate the taste of RO-treated water too. By eliminating unwanted substances, it often results in fresher tasting hydration options. These units offer peace of mind regarding the quality of your drinking supply.
Benefits of Using a Used RO Unit
Using a used RO unit can be a smart choice for many homeowners. One major benefit is cost savings. Purchasing a second-hand system typically costs significantly less than buying new.
Another advantage lies in the environmental impact. By opting for a used unit, you’re contributing to reduced waste and promoting sustainability. It’s an eco-friendly alternative that keeps functional equipment out of landfills.
Used RO units often come with robust filtration capabilities, providing clean drinking water just like their newer counterparts. Many models are built to last, so you’re likely getting reliable performance without the hefty price tag.
Additionally, installing a pre-owned system often leads to quick installation processes. Most systems have standard fittings and designs that align well with existing plumbing configurations, making it easier to set up right away.
Things to Consider Before Installing a Used RO Unit
Before diving into the installation of a used RO unit, several factors should be on your radar.
First, assess the condition of the system. Check for any visible signs of wear or damage that could affect performance. It’s wise to ensure all components are in working order.
Next, consider the age of the unit. Older models may not operate as efficiently and could lack modern features found in newer systems.
Compatibility is also crucial. Ensure that your water supply matches what the RO system requires. Different units have varying needs when it comes to pressure and flow rates.
Think about maintenance requirements. A used RO unit might need more frequent checks and replacements than a new one, so factor this into your decision-making process for long-term use.
Step 1: Gather the Necessary Tools and Materials
Before diving into the installation of your used RO unit, it’s crucial to gather all necessary tools and materials. This preparation will streamline the process and minimize potential setbacks.
Start with basic tools: a wrench, screwdriver, and pliers. These will help you tighten connections and secure components effectively.
Next, ensure you have the right supplies on hand. Look for food-grade tubing appropriate for water filtration systems. Additionally, check that you have filters compatible with your specific RO unit model.
Don’t forget about connectors or fittings needed for plumbing adjustments. Some installations might require Teflon tape to prevent leaks at threaded joints.
Having everything ready before starting can save time and keep frustration at bay during installation. With these essentials in place, you’re well on your way to enjoying purified water from your used RO system!
Step 2: Preparing the Space for Installation
Before diving into the installation of your used RO unit, it’s important to prepare your space. Start by selecting a suitable location. Ideally, this should be close to your water supply and drainage for convenience.
Clear the area of any clutter or debris. A clean workspace not only makes the process smoother but also minimizes risks during installation.
If you’re installing under a sink, ensure there’s enough room for all components—filters, storage tank, and faucet. Checking dimensions can save you from headaches later on.
Consider ventilation as well; adequate airflow is crucial if you’re working with tools that generate heat or fumes. Taking time to set up ensures a seamless installation experience without unnecessary interruptions down the line.
Step 3: Assemble the RO System
Now that you have prepared your space and gathered all the necessary tools, it’s time to assemble your used RO unit. Start by laying out all components on a clean surface. This includes the membrane housing, filters, and tubing.
Follow the manufacturer’s instructions carefully for each part of the assembly. Typically, you’ll begin with attaching pre-filters to their designated spots. Be sure they fit securely; any gaps can lead to leaks later.
Next, install the reverse osmosis membrane into its housing. Pay attention to orientation; improper placement can affect performance.
Connect any additional features like storage tanks or UV lights as needed. Use Teflon tape on threaded connections for an airtight seal.
Double-check everything before moving on—correct assembly is crucial for optimal function! Take your time here; a well-assembled system will set you up for success down the line.
Step 4: Connecting the Water Supply and Drainage
Now it’s time to connect the water supply and drainage. Start with the inlet valve on your used RO unit. This is where your fresh water will flow in.
Locate the appropriate tubing or hose that came with your system. If you’re missing any components, don’t hesitate to grab replacements at a local hardware store.
Attach one end of the tubing to your cold water supply line. Ensure it’s tightly secured to prevent leaks. You may need a wrench for added grip, so keep one handy.
Next, find the drain connection on your RO unit. Connect another piece of tubing here and run it towards your sink’s drain or designated waste outlet.
Make sure all connections are snug but not overly tightened; you want a balance between security and accessibility for future maintenance tasks. Check everything before moving forward—leaks can be troublesome down the road!
Step 5: Testing and Adjusting
Testing and adjusting your used RO unit is crucial to ensure it operates effectively. Once everything is connected, turn on the water supply slowly. Look for any leaks around the fittings or connections. If you spot any issues, tighten the fittings as needed.
Next, allow the system to run for a few minutes before testing the water quality. You can use a TDS (Total Dissolved Solids) meter to check how well your unit is filtering out impurities. The lower the TDS level, the better!
After confirming that everything works correctly and there are no leaks, you’ll want to adjust settings if applicable based on your specific model’s requirements. This might involve calibrating pressure levels or setting timers for automatic flushing cycles.
Make sure to keep an eye on performance over time. Regular maintenance will help extend its life and efficiency.
With these steps completed, you’re now equipped with clean drinking water right from home – all thanks to your used RO unit! Enjoy pure hydration without breaking the bank.


